Shop made marking and mortise gauges

Tags

, ,

I’ve been making do with this combination marking and mortise gauge from Harbor Freight www.harborfreight.com/6-inch-mortise-gauge-94645.html.

image_14953

The mortise gauge side is useless, as it has a broken pin that can’t be corrected.  I moved the pin on the single pin side from the bottom of the arm to the corner to increase its functionality (Another tip from Paul Sellers from this post: https://paulsellers.com/2011/10/make-your-own-5061-style-gauge/).  This improved the gauge a lot, but it didn’t take long for it to wear enough for the fence to beam tolerance to wear enough to make the gauge frustrating to use.  The thumbscrew is difficult to tighten, and the gauge takes both hands to adjust.  I suppose for the 10 bucks or so I spent on it I can’t complain, but once I understood how the tool was supposed to work, I wanted something better.

I inherited a Stanley Dual beam marking gauge and a really nice screw adjustable mortise gauge from my grandfather, but both of them need new pins and I bought the wrong size music wire to replace them.  They’ll also be going to my father as part of his retirement present after I restore them, so I knew I would need my own.  I did quite a bit of looking around the internet at different designs.  Most of the good ones around are based on an old French design recently brought back to life in an article by Dean Jansa in Popular Woodworking Magazine (You can download the article here: www.popularwoodworking.com/articleindex/mystery_of_the_marking_gauge).  They work by using a wedge or a dowel mortised at an angle to the beam.

I first saw this design in this video on the Logan Cabinet Shoppe a couple of years ago but didn’t think much of it at the time.

I found it again on the Literary Workshop blog not too long ago (literaryworkshop.wordpress.com/2012/06/22/how-to-make-a-marking-gauge/) along with a design for a really neat design for a mortise gauge (literaryworkshop.wordpress.com/2011/09/08/a-mortise-gauge-you-can-make/)  I was really impressed with the mortise gauge, but wasn’t sure I would like the dowel locking mechanism, thinking it would be annoying to lock and unlock.  I decided to try it, so I made a couple of the marking gauges since they would be pretty quick to make.  I decided to make them with only hand tools, so it took a few hours, but I really enjoyed it.

wpid-wp-1422852546882.jpeg


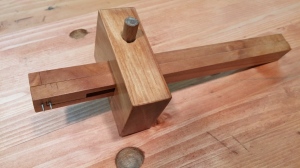
I used Apple wood for the fences, and made one of the beams from the same Apple board and the other from Walnut.  I also beveled the bottom corner on one.  I considered using the same wood and pattern for both of them, but thought it would be nice to be able to tell them apart at a glance if I was using them both on a project for different settings.  I finished them with shellac and a coat of furniture wax.  You can see how the locking mechanism works, you can click the pictures to enlarge them if you need to:

wpid-wp-1422852724203.jpeg

Loose position:

wpid-wp-1422852708886.jpeg

Locked position:

wpid-wp-1422852714703.jpeg

Then it was time for a test drive.

wpid-wp-1422852566136.jpeg

I am seriously impressed with these gauges.  They are easily set with one hand, pressing on the dowel with my thumb holds the setting temporarily so I can check it with a ruler or against the piece to be marked.  A quick tap of the dowel on the bench locks it solidly.  Another bench tap on the other side of the dowel releases everything nicely.

Once I decided I liked the locking mechanism, it was time to build the mortise gauge.  This was a bit more of a complicated build, with a small through mortise and sliding block in the beams that have to fit very closely, as well as two beams that have to fit the fence mortise perfectly instead of just one.  It came out ok, but the next one I build will be better.  I did all the steps correctly, but I will do them in a different order next time to make things simpler and a little neater.

I used Apple again, because I love the way it looks and it works really nicely.  When I was touching up the pins with a diamond card file before I rounded the top of the fence I realized that being able to set it upside down on a flat top was pretty convenient for this operation.  I also thought that keeping the mortise gauge square would make it easy to tell it apart from my other gauges in the bottom of a dark drawer or on the bench, so I skipped the round top.

wpid-wp-1422852657619.jpeg

wpid-wp-1422852673804.jpeg

The cut lines on the beams correspond to the widths of the three chisels I use the most for mortising, a 1/4″, 3/8″, and a 1/2″, but the pins can be set from 3/16″ to up to 1″ apart.

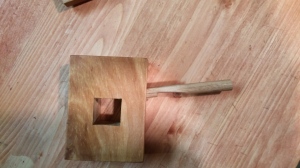
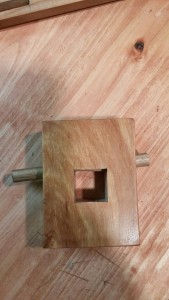
Here it is taken apart:

wpid-wp-1422852691232.jpeg

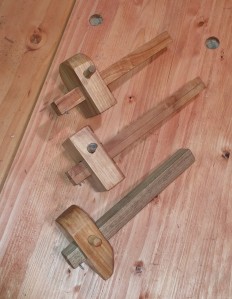
And all of them together:

wpid-wp-1422852832351.jpeg

I really enjoyed these builds, and they were a nice refresher for some hand tool skills I haven’t used in a while.  I hope they don’t wear the way that my Harbor Freight gauge has, but if they only last a few years they aren’t hard to make.  I’ll definitely be making a set like this for Dad’s tool kit, maybe out of some figured wood.

Lakeside #4 plane part 3, sole flattening, sharpening, and sides.

Tags

, , , ,

This will probably be the last post about this plane for a while, as its now ready to work.  The plating on the lever cap is pitted pretty badly, but I haven’t decided how to remedy that yet.  Not sure if just polishing it and ignoring the pitting (it doesn’t affect function one bit) or if I’m willing to take a chance on removing the plating either chemically or mechanically and taking it down to the bare metal underneath like the older types.  But that can wait.

The next step I took in the restoration is one of the few that were about function rather than looks.  For a smoothing plane to work right it is pretty important that the sole be flat  If the area in front of the mouth isn’t coplanar with the area behind it the plane will produce curved surfaces instead of the flat and straight we are looking for with this tool.  I don’t take this to a ridiculous level like some do but I do take care to use a reasonably flat tile on a benchtop I’ve checked for flatness with a shop made straight edge, as the tile can still flex if you aren’t careful.  I followed the steps in this video by Paul Sellers, but his method is pretty standard in the woodworking community.

I didn’t take many pictures throughout the flattening process but here is one from before I did anything to the plane:

Before picture #2

Before picture #2

And here is one after about a half hours work and 5 or 6 pieces of 120 grit:

The sole after flattening.

The sole after flattening.

As you can see there is a spot at the toe that was worn down significantly more than the rest, and there are several lines that run the length of the plane in the middle.  This indicates that it was used on narrow edges a fair amount by a previous owner.  This shows an important point, that simply using a plane will wear it over time, and that flattening isn’t a one time thing.  It’s also why I don’t bother polishing the sole to a higher grit than 220, as the wood will leave scratches behind after some use.  After a couple of sheets of 220 the sole will look like this:

As you can see, there are still a few marks in the middle but it is more than flat enough to work perfectly.

As you can see, there are still a few marks in the middle but it is more than flat enough to work perfectly.

Next came sanding the sides of the plane.  I clamp the plane with one side up in my bench vise (gently, these cast planes can be cracked) and just use finger pressure.  I start with 120 grit to remove the dark coating from the Evap-o-rust, remove those scratches with 220, and finish out with 400.  I didn’t want to take it to any higher level of polish, as this plane still has some “character”, otherwise known as scars from the pitting.  I was worried if I went past a brushed metal look that the pitting would really stand out, but as it is now it looks like a vintage tool that has seen a lot of use.  I like it, not too pretentious for a hardware store tool.

I went through the same sanding process on the chip breaker and the iron, up to 400 grit.  I used finger pressure until it was time to start polishing the back of the iron where it will be sharpened.  I am a convert to the Paul Sellers method of sharpening (big surprise I know).  I won’t get into it as in this case a video is worth a thousand words…

That’s the last Paul Sellers plug for this post, I promise.  But it is simple, fast, and doesn’t take long to learn.  The diamond plates are expensive up front, but they will last a long time and stay flat.

I also cleaned the adjusting wheel and the toe/knob screws with Brasso.  I usually do this step on the couch while watching TV.  A couple paper towels, a bunch of q-tips, and one sitcom later they have a nice shine and are ready to go.

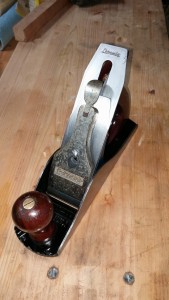
All that was left to give all the parts a thorough wipe down with the 3-in-1 oil I use on all my tools to prevent rust and lubricate the sole in use, reassemble, and take the after pictures.  So here are the before pictures with the after pictures for comparison:

Before picture #4

Before picture #4

After picture #1

After picture #1

Before picture #2

Before picture #2

After picture #2

After picture #2

Before picture #1

Before picture #1

This side still shows some pitting, but the rust is stopped.

This side still shows some pitting, but the rust is stopped.

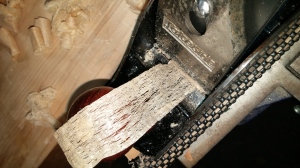
And then came the test drive:

The obligatory proof shot...it produces shavings!

The obligatory proof shot…it produces shavings!

wpid-wp-1421295255797.jpeg

And the only result that matters, a pristine surface better than anything I can get with sandpaper left behind:

The actual end goal, which isn't the shavings...a perfectly smooth surface left behind.

The actual end goal, which isn’t the shavings…a perfectly smooth surface left behind.

Lakeside #4 restoration continued.

Tags

, , ,

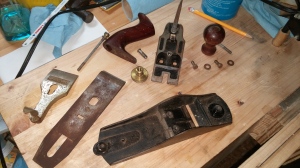
Fully disassembled, note all the rust on the iron and cap iron.

Fully disassembled, note all the rust on the iron and cap iron.

The first thing that I do with any vintage tool I want to restore is to give it a good cleaning.  I use blue windex type glass cleaner because it works well, is cheap, and will clean without destroying the patina of a used tool.  I completely disassembled the #4 and applied a little bit of glass cleaner mixed with some elbow grease.

Sometimes this cleaning and a coat of oil is all that’s needed to get a tool back to work.  In this case there was some serious rust to remove as well.  For that purpose I have used several approaches.  If I don’t care about preserving paint, japanning, or some other coating I’ll often use white vinegar.  It works well and is cheap.  In this case I didn’t want to remove any of the japanning so I used a product called “Evap-o-Rust”.  It can be purchased at most auto supply stores as well as Harbor Freight Tools (Surprisingly, it’s cheaper at the auto supply places than Harbor Freight).   Simply clean off any loose rust and submerge the part into the solution. It works amazingly well, and is pretty safe to work with.  It can also be disposed of by just pouring it down the drain, which to me is a big plus. I haven’t had to dispose of any, as the gallon I have has de-rusted several planes, a couple of saw plates, a full set of auger bits, and several other small things and shows still shows no signs of slowing down.  It’s more expensive than vinegar but works wonderfully and as much as you can re-use it I think it is a good value for money.

For this I used a small tote lined with a garbage bag, simply because I couldn’t get the evaporated dregs of some other cleaning project out of the bottom of the tote.

Ready for a bath.

Ready for a bath.

I didn’t take any pictures of the this while it was soaking, but you get the idea.  I left it to soak overnight.  Following the directions of the Evap-o-rust I gave the parts a good scrubbing under hot water with a brush to remove the blackish film left behind which cleans off very easily.  I then applied a lesson from the first time I used Evap-O-Rust and immediately sprayed things down with WD-40 to prevent flash rust, which happens very quickly if you aren’t careful with this process.  I don’t use WD-40 as a long term rust preventative, but for flooding parts like this that will likely get sanded anyway in the next day or two it is perfect.

Here are the parts after my rust removal process:

After Evaporust.

After Evaporust. You can still see the scars from the pitting, but the rust is completely gone.  Still a little staining on the side of the plane but that is from some sort of lacquer or other film finish. 

After Evaporust.

After Evaporust. There was some unusual discoloration on the iron but it sanded right off.

After Evaporust.

After Evaporust.

On this plane the lever cap screw was stuck, and couldn’t be tightened enough to produce the desired tension.  A little cleaning of the screw and threads with a brush and a very small needle file for one damaged thread quickly put things right.

Next post I will talk about the rest of the cleaning process, lapping the sole, and setting the plane up for use.

First Batter Up…Lakeside #4 Plane.

Tags

, , ,

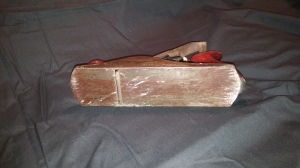
Before picture #4

Before picture #4

One of the tools I inherited from my Grandfather was a Lakeside #5 Corrugated Sole jack plane. I’d never heard of a plane maker named Lakeside, so I did a little research and found out that “Lakeside” was the house brand name for Montgomery Wards tools, similar to the “Craftsman” brand being synonymous with Sears.  The main difference between the two that I can find is that while Craftsman tools are often unique, Lakeside tools were made by other major manufacturers like Stanley and simply branded with Lakeside insignia.  This was an interesting coincidence for me.  When I was growing up a major part of our family yearly schedule revolved around Christmas, as Dad operated several Christmas Tree lots between Thanksgiving and Christmas every year.  It took about a 6 day drive to get there in 6 year old time (I think it was really only about 10 hours), but every year Mom and I would head down for about 10 days to see him and help out.  All of the lots were in the parking lots of the same chain of stores. You guessed it, they were Montgomery Wards stores. Once I learned the history of the Lakeside brand, I saved an Ebay search and have picked up a couple other of their tools for Dad’s kit, I think he’ll get a kick out of it when I explain it to him.

Often these store brand tools were less expensive versions of the original tools, and these planes are no exception.  However they are often good tools that can be had for less money on the vintage tool market because they aren’t usually desirable for collectors.  This number #4 doesn’t have a screw adjustable frog (the mechanism that holds the iron and controls how wide the mouth of the plane is set).  It is adjustable,  just takes a little fiddling and more time.  Other than that this plane operates identically to my Stanley.  The quality is actually pretty surprising, this plane has the least amount of backlash in the adjustment wheel of any vintage plane I’ve used.

Before shipping I paid $30 on Ebay for this plane, and honestly I overpaid.  You could probably find this or other store brand plane for a few bucks at a garage sale or thrift store, but I wanted another Lakeside to match the inherited one for Dad’s tool set.  There is usually at least one of these planes on Ebay at any given time, with obvious differences in condition.  This one was in decent but not great shape, but I could see that all the parts were present, the major pitting was limited to non critical areas, and there was a lot of the original iron present.  Normally if I was buying a Stanley or other plane for a user tool I wouldn’t worry too much about the iron length, but in this particular case it was important to me as the irons are marked with the Lakeside brand and finding a replacement would be difficult.

I’ll let the before pictures do the talking for it now, and talk about the restoration in future posts.

Before picture #2

Before picture #2

Before picture #4

Before picture #4

Before picture #1

Before picture #1

On the Blog Name.

Why name the blog “Tools of our Fathers”?

3 reasons:

  1. This blog will be focused around hand tools, historic forms that have been around for centuries in one form or another.  Looking to history is where I found the inspiration to set my shop up in a way that didn’t require thousands of dollars worth of power tools, and my opinion is that in some ways the quality of the furniture built before the industrial revolution hasn’t been surpassed since.
  2. The tools I will be restoring and making will be a retirement gift to my father in a few years (See “Why am I starting this blog?” https://toolsofourfathers.wordpress.com/2015/01/11/why-am-i-starting-this-blog/ for a more in depth explanation)
  3. Several of the tools I’ll be restoring and giving to my father are actually tools I inherited from my grandfathers shop, my father’s father that is.  I get a little lift every time I pick one of these tools up, for what some might think is a strange reason.  A few years before his death my grandfather bought a security engraver tool and went on a spree in his shop, writing his (and ours) last name in a capital block script on everything that would hold still long enough to be engraved.  To be honest, I think that these engravings are the only time I ever saw his handwriting and they are certainly the only examples of it that I have.  Even though most collectors view this kind of marking as detracting from the value of the tool, to me it is priceless.  I think that most of these tools originally belonged to one of my Dad’s uncles, but they were owned for many years by my grandfather before they came to me.  The trail of ownership from my father’s father to me and eventually back to my father is an interesting twist to me, and inspired the name of the blog.

Why am I starting this blog?

Like many people, my first exposure to woodworking came in my Father’s shop.  Also like many people, I’ve heard a shift in the way my Dad is talking about the future.  He’s started to use the phrase “When I retire…” quite frequently.  I didn’t catch on to it immediately, but once I noticed it started coming up with more and more frequency.  I hadn’t really considered what it meant until a couple of years ago, but it began to dawn on me that it won’t be long until things will change dramatically for him.  He will have days to fill that for the last half century have been structured by tasks to be accomplished, places to be, and people to help.  I wondered “What will happen to him? How will he feel?” Accomplished I hope, but I also think it might be a bit depressing when the reality of closing out a distinguished career sets in.  I worry that without the direction of going to work every morning that he will become less active and his mental and physical wellbeing will suffer in the long term.  I hope that he takes a well-deserved resting period, but finds things he enjoys to fill the void and keep him motivated to learn and create to keep him sharp. Dad’s retirement date isn’t settled yet, but sometime in the next 2 to 5 years he will be turning in his equipment and filling out his last timecard. One of the things he has expressed interest in is returning to woodworking, which is something I hope I can help him with.

Dad owns a lot of tools for many different types of work.    As I’ve learned about woodworking I’ve come to realize that Dad is going to run into the same problems I did, that all of his tools are well suited to home remodeling but other than a contractors table saw, a radial arm saw, and a power router he doesn’t own any quality woodworking tools.  We’ve made some small projects the last few times I’ve been home, and even cutting a couple simple rabbets caused us to scratch our heads about how to do it with the tools currently in his shop.

Some of the most frustrating experiences I’ve had in the last two years in my own shop have all revolved around not having the right tool to accomplish a task.  The more I learn about hand tool central woodworking, the more I realize that there is a core set of tools that a knowledgeable woodworker can use to make almost anything.  The key is knowing what they are, how to sharpen and set them up, and how to use them.  There are a lot of opinions about how extensive that core set of tools is, but most people can agree about the basics such as planes, saws, chisels and the like.  I decided that the best retirement gift I could give to my father is a set of those core hand tools, along with all of the related equipment he’ll need to keep them in top operating shape so they are ready to hand when he needs them.  I can’t think of a better way to show my appreciation for all the things he has taught me than to put my own efforts into restoring and making most of the tools he’ll need to fully enjoy this hobby, or at least the joinery tools.  I imagine he will take the same route I have and use “tailed apprentices” (power tools) for stock dimensioning, saving the hand tools for joinery and final fitting/finishing.  I could be wrong and he might want to use power tools for everything, but there are always tasks that are more enjoyable and often more efficient and safer with hand tools.  I hope he finds the same enjoyment and reward using them that I do.

The last task will be to build either a cabinet or a chest to store the tools, using only the set I’ve put together for him.  Hopefully it will be nice enough to give him encouragement about how well hand tools can work, and it will give me a chance to put each of the tools through its paces to ensure that they are indeed ready for service.  Knowing me, forcing myself to use only the things that will go into his chest will also quickly show me which essentials I forgot about and need to include!

So why am I writing all of this?  The answer to that question lies in the future posts of this blog I hope.  I’m going to document the steps I take in this endeavor, making the tools I can and restoring vintage examples of the rest.  I’ve already restored quite a few tools for my own use and I think I now have the required techniques figured out, as well as the knowledge of how most of these tools should perform to make good examples of the ones that are feasible to make myself.

There will also be posts on things that I think need to be purchased new, which brands I chose and why.  I’ll probably also briefly touch on projects I’m currently working on in my own woodworking when I’m not working on Dad’s tool set.  At the end of it all my goal is to have a record of the entire project that I can share with my father so he can see what went into selecting, restoring, and building his tool set.  I also hope it might give someone else new to this way of working a good idea of the necessary tools, techniques, and cost of doing this for themselves.  That is however a secondary goal, and if the only readers of this blog are myself and someday my father then I’ll consider it time well spent.

I have a couple of years to source and restore the vintage tools he’ll need, and will probably make a few prototypes of the tools I will make for him before the final product .  I imagine I’ll need all of that time to make this a tool set that I’ll be proud to give him when the time comes, and one that he’ll be proud to own and use.

I hope that when the sad but inevitable day comes when I inherit these tools back that they will be worn from use by his hands and the material he’s used to make whatever will give him happiness in his retirement, but also that the care and thought I put into them will ensure they will last and be useful for another generation or two.  On that sorrowful day they’ll replace my own tools, and I hope whenever I use them that I’ll think of the man who inspired me to make them.  And hopefully one day I’ll pass them down to an interested son or daughter of my own, and say “I made these for your grandfather, then they were mine, and now they are yours.  Use them well and when you do, remember us.”

First Post

Tags

,

Starting this blog is one of my goals for the year 2015.  But here I find myself on the 5th of January, no closer to providing content than registering for a WordPress account, and I realize that it is time to write something, anything, related to what I want to accomplish with this endeavor.  So for now I will begin with a brief introduction and a history of my journey in this craft to date.

I am an aspiring amateur furniture maker.  About 2 years ago I began putting together a small woodshop in a detached 2 car garage.  With limited funds and little experience other than a few semesters of high school woodshop I began accumulating tools and lumber.  Craigslist has been a friend, rewarding me with a jointer, lunchbox style thickness planer, and a used Harbor Freight table saw that scares me a little every time I turn it on.  I bought a brand new fixed based/plunge router combination set, as well as a quality corded drill.  As I envisioned projects I wanted to build, I kept mentally coming up against construction steps that I didn’t have a means to accomplish.  One day I thought to myself “How was this done before power tools?” and my journey down the rabbet hole of hand tool woodworking began.

After a lot of paralysis by analysis with the overwhelming amount of information about this subject available on the internet, I discovered Paul Sellers ( https://paulsellers.com/) and the Woodworking Masterclasses (https://woodworkingmasterclasses.com/). What a breath of fresh air that was!  Paul has written and filmed at length about traditional hand tool methods.  He also espouses a simple 10 tool set that allows you to make the 3 joints he considers essential to  woodworking (The dovetail, mortise and tenon, and dado/housing joints).  Paul has been widely criticized by people who haven’t taken the time to thoroughly research his views (more on this later), but he has given me what I think might be the most important gift a woodworking teacher can give…the belief that I really can do this, and it won’t require a loan to put together a shop with thousands of dollars worth of power tools.  I won’t elaborate further on that gift in this post, but I have made several projects following Paul’s instruction and it really is amazing what can be accomplished with a few restored tools and the knowledge to wield them somewhat competently.  I encourage anyone sitting on the fence to take the plunge and subscribe to the Masterclasses, it is well worth the small monthly fee.

Now on to the circumstances motivating me to write this blog, it’s intended audience, and what I hope to accomplish here, but that will have to wait for the next post.